

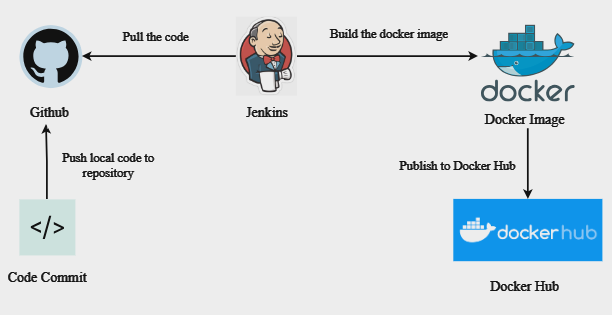
Microservice Application Deployment With Tools - Jenkins CI/CD, Docker, GitHub

Jenkins CI/CD with GitHub integration on an AWS EC2 instance is a powerful combination that automates the build, test, and deployment processes, enabling developers to focus on writing code and delivering features.
Imagine you have a personal blog hosted on an AWS EC2 instance, and you frequently update its code on GitHub. With Jenkins CI/CD and GitHub integration, whenever you push new changes to the GitHub repository, Jenkins automatically triggers the CI/CD pipeline. It builds the latest code, runs tests to catch any issues, and deploys the updated blog on the AWS EC2 instance. This automation ensures your blog is always up-to-date and running smoothly without any manual intervention.
Lets start with the implementation-
STEP 1: LAUNCH AN EC2 INSTANCE
Log in to the AWS Management Console.
Navigate to the EC2 service.
Name the EC2 instance accordingly and choose an appropriate Amazon Machine Image (AMI) based on your requirements.
Configure a key pair giving it an appropriate name. Choose .pem private key format for Ubuntu. Click on create key pair.
In the Network settings allow SSH, HTTP, HTTPS traffic as below. Leave the rest to default.
6. Launch the instance.
STEP 2: CREATE A DOCKER IMAGE AND INSTALL JENKINS
Connect your EC2 instance using SSH client or Instance connect.
Update the package lists on the EC2 instance by running the following commands:
Install docker and give user permissions to access it.
sudo apt update
sudo apt upgrade
sudo apt install docker.io
sudo usermod -aG docker $USER
sudo reboot
4. Clone your git repository. A sample repository link is given below.
git clone https://github.com/ramkhadke/django-notes-app.git
5. Build the docker image and run using the following command.
docker build -t notes-app .
docker run -d -p 8000:8000 notes-app:latest
6. Install java for Jenkins installation.
sudo apt update
sudo apt install openjdk-17-jre
wget -q -O - https://pkg.jenkins.io/debian/jenkins.io.key | sudo apt-key add -
7. Add the Jenkins repository to the package manager sources list:
sudo sh -c 'echo deb http://pkg.jenkins.io/debian-stable binary/ > /etc/apt/sources.list.d/jenkins.list'
8. Update the package manager to fetch the new repository information
sudo apt update
9. Install Jenkins
sudo apt install jenkins
STEP 3 : SETUP JENKINS
1. To run the Jenkins server go to the security groups of the instance and add a inbound rule for custom TCP (i.e. 8080 for Jenkins) with the source being ‘My IP’
Now sign in into Jenkins using [public IP of instance:8080] in the browser
example:[173.31.0.0:8080]
You will see the below screen:
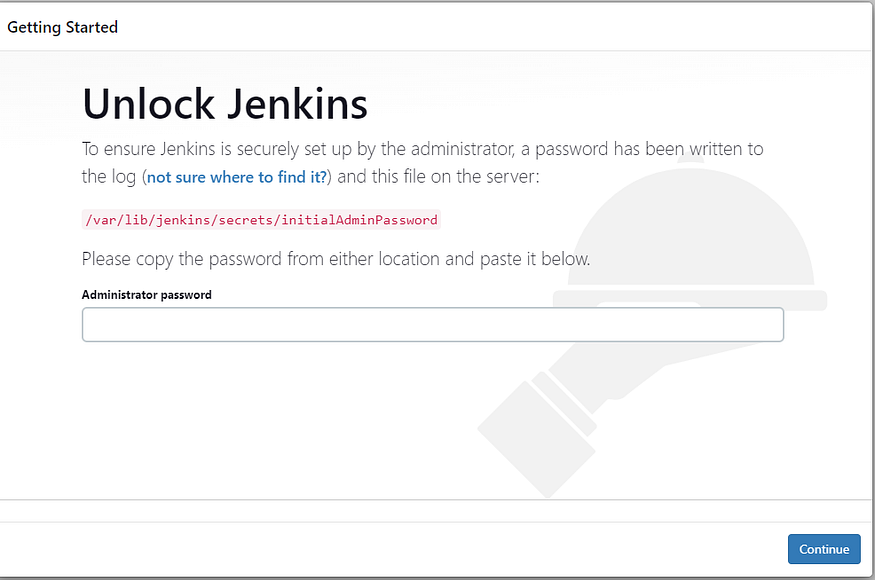
2. Execute the below command in the CLI to get the administrator password:
sudo cat /var/lib/jenkins/secrets/initialAdminPassword
On the next screen, we'll select the "Install suggested plugins" option which will install all the necessary plugins needed for the initial setup.

When the plugin installation is complete, you’ll be prompted to set up the first administrative user. It’s possible to skip this step and continue as
adminusing the initial password from above, so we'll do that, for now, to keep things simple!You can now start using Jenkins through the main dashboard:

3. Congratulations on completing the Jenkins installation 🎉
4. Click on create a job >Add a job name and select pipeline>Click next.
5. Give it a description and check the GitHub project option and add the URL.
GitHub Webhook Trigger Jenkins Build Pipeline
This is an interesting part of the entire tutorial and the project!
To trigger a Jenkins build whenever Developers commit something into the repository, we will use a GitHub Webhook to configure this functionality.
Webhooks can be triggered whenever specific events occur on GitHub. For example, you can configure a webhook to trigger whenever:
Code is pushed to a repository.
A pull request is opened.
and more.
Let us proceed to set up a webhook trigger for the use case:
In the pipeline configuration section on your Jenkins dashboard, scroll down to the Build Triggers section and select the option:
GitHub hook trigger for GITScm polling.
This enables Jenkins to be notified of any changes to our GitHub repository, through the webhook we'll create.
In your GitHub repo, head over to
Settings> Webhooksand Click onAdd Webhook.Below are the necessary details needed to create a webhook:
Payload URL - The payload URL is the URL of the server that will receive the webhook POST requests. In this case, the target server is the Jenkins server running at
http://YOUR_IP_ADDRESS:8080which we'll append with/github-webhook/.Content-Type -
application/json.Trigger - Just the push events.

Congratulations! You have successfully configured a GitHub Webhook 🎉 that will listen for any commit pushes on the repository and trigger a new Jenkins build.
6. Check GitHub Webhook Trigger for GIT SCM polling.
7. Add the pipeline script in git - Jenkinsfile as given below:
pipeline {
    agent any

    stages{
        stage("Clone Code"){
            steps {
                echo "Cloning the code"
                git url:"https://github.com/ramkhadke/django-notes-app.git", branch: "main"
            }
        }
        stage("Build"){
            steps {
                echo "Building the image"
                sh "docker build -t my-note-app ."
            }
        }
        stage("Push to Docker Hub"){
            steps {
                echo "Pushing the image to docker hub"
                withCredentials([usernamePassword(credentialsId:"dockerHub",passwordVariable:"dockerHubPass",usernameVariable:"dockerHubUser")]){
                sh "docker tag my-note-app ${env.dockerHubUser}/my-note-app:latest"
                sh "docker login -u ${env.dockerHubUser} -p ${env.dockerHubPass}"
                sh "docker push ${env.dockerHubUser}/my-note-app:latest"
                }
            }
        }
        stage("Deploy"){
            steps {
                echo "Deploying the container"
                sh "docker-compose down && docker-compose up -d"

            }
        }
    }
}
Creation of a Jenkins pipeline using this script is done. When you trigger the pipeline, Jenkins will run on an available agent, and the first stage “Clone Code” will be executed.
Jenkins will clone your Django notes app code from GitHub. Next, the “Build” stage will run. Jenkins will use the Dockerfile in your code repository to build a Docker image for your Django app named “my-note-app”.
After successfully building the image, the “Push to Docker Hub” stage will start. Jenkins will tag the image as “your-docker-hub-username/my-note-app:latest” and push it to Docker Hub using your Docker Hub credentials. Finally, the “Deploy” stage will run.
Jenkins will use Docker Compose to deploy your Django notes app, making it accessible on the specified port.
Credentials are used in the script which we will create next.
8. Save the pipeline.
STEP 4: ADD DOCKER HUB CREDENTIALS
To keep the credentials private, we can upload them on Jenkins credentials and use them as variables. In the
securitysection, click on New Access Token, to generate a new token which we'll use to authenticate with Jenkins.Navigate to Dashboard>Configuration and add configuration.
Give the username, password and credential ID. The username and password should be your Docker Hub credentials.
STEP 5 : Let's execute our Pipeline
Navigating from Dashboard>application click on build.
Now, it's time to test the entire automation. Here is what you can do:
Head over to the GitHub repo and commit a small change in the app. I'd suggest making some changes to the code so that it will be visible once deployed.
Head over to the Jenkins dashboard where a Jenkins build will automatically be triggered. You can see the pipeline stages defined in the Jenkinsfile being executed in sequential order.
During the build process and once the build is complete, you can refer to the logs to see which operations were performed during the execution process.

Wait for the successful build.(Check the console output if any error occurs).
The deployment has been successfully been completed and the application can be viewed on the specified port.

Successfully Deployment with Jenkins CI/CD pipeline with GitHub Integration. Also After Completion Delete.


